Colorful Sweet peas

Hi everyone!

I am back for a quick post before the semester starts. Today I decided to have some fun with colored pencil and some sweet pea stamps from Altenew.

20180804_011931

I have recently started to experiment with colored pencils and I just love how they look on top of kraft cardstock. The contrast in color is really beautiful.  Here, I follow Jennifer Mcguire advice of using gamsol (solvent) to easily blend the colors together. This blending trick makes even a newbie like me produce beautiful blends of color without a lot of effort.

20180804_012109

I love the resulting cards! They are small and simple cards but have a delicate look that I was not expecting.

Hope you enjoyed the post and give colored pencils a try!

Materials used:

  1. Prismacolor colored pencils – 36 piece set (Az)
  2. Prismacolor colored pencils – Botanical garden set (Az)
  3. Altenew Sweet pea stamp set (Altenew)

Simply watercolor (Day 5)

Hi guys! I am back (a couple of days late) for the last day of Kristina Werner’s Simply watercolor class. We finish the class with flowers, which is very exciting!

Day 5 – Florals and leaves 

The first lesson focuses on abstract looking leaves. I was a little skeptic about these abstract flowers, but I actually like the final card. It looks simple but elegant.

fullsizeoutput_127

The second lesson served as a way to practice different shapes of leaves. I have to keep practicing my leaves but I like the card. I added washi tape to this card to cover up a little tearing of the paper from when I peel the masking tape back.

fullsizeoutput_12a

Supplies used: 

  1. 12-color watercolor set (Any set you have works!)
  2. Washi tape or painters tape
  3. Canson XL watercolor paper; 140lb cold press (Amz)
  4. Flat #9 brush from the Benicci 15-pieces set (Amz)
  5. Round #8 brush from the Benicci 15-pieces set (Amz)
  6. Round #5 brush from the Benicci 15-pieces set (Amz)
  7. Sakura Pigma Medium brush pen (Amz)
  8. Sakura Gelly white pen (Amz)
  9.  Tombow plastic eraser (Amz)
  10. T ruler (Amz)

SWC_participant


Simply watercolor class (Day 4)

Hi guys! I am back for another day of Kristina Werner’s Simply watercolor class.  I was super excited for this class because I wanted to play around making starry night skies or galaxies.

Day 4: Landscapes and Nature

First lesson: Simple landscape

Here I had a trouble with the washi tape I used to mark off the border of my landscape and the colors leaked creating blurry borders. I didn’t like it so I cut off my landscape and adhered it to a card front.

20180720_040006(0)

Second lesson: Starry Sky

Here is my blue-green starry sky, which I love!! I can believe how good it came out. The key was to make sure the tape was well secured so the colors wouldn’t bleed underneath the tape.

20180720_040039.jpg

I had so much fun, that I made a second starry sky.

20180720_035934.jpg

I finished both of my skies using border stamps from Pinkfresh studio.

Supplies used: 

  1. 12-color watercolor set (Any set you have works!)
  2. Washi tape or painters tape
  3. Canson XL watercolor paper; 140lb cold press (Amz)
  4. Flat #9 brush from the Benicci 15-pieces set (Amz)
  5. Round #5 brush from the Benicci 15-pieces set (Amz)
  6. Round #2 brush from the Benicci 15-pieces set (Amz)
  7. Sakura Pigma Micron 05 pen (Amz)
  8. Pink Fresh Studio’s  Lovely Borders stamp set (SB)
  9. Sakura Gelly white pen (Amz)
  10.  Tombow plastic eraser (Amz)
  11. T ruler (Amz)

SWC_participant

Simply watercolor class (Day 3)

I am back for day 3 of Kristina Werner’s Simply watercolor class. I am having a lot of fun with this class!! It has been great to be pushed out of my comfort zone and create cards from scratch, without any stamps.

Day 3 – Lettering and Typography

For me, today’s challenge was to make straight lines that are actually straight.  Even with a ruler, I have problems with straight lines. I think I got carried away with the amount of water I used and that created puddles that turned into shaky lines in my letter.  I am still proud of my letter and this project was a lot of fun!

Here is my homework!

fullsizeoutput_122

Supplies used: 

  1. 12-color watercolor set (Any set you have works!)
  2. Canson XL watercolor paper; 140lb cold press (Amz)
  3. T ruler (Amz)
  4. Round #2 brush from the Benicci 15-pieces set (Amz)
  5.  Tombow plastic eraser (Amz)

SWC_participant

Simply watercolor class (Day 2)

I am back with my homework card for day two of Kristina Werner’s Simply Watercolor class. You can still join the class if you are interested (Onlinecardclasses.com).

Day 2 – Simple critters and animals

In today’s lessons, the objective was to create cute animals from simple geometric forms. I like my finished card but I still struggle to create light washed when coloring my critters.  I always end up going for bright and bold colors, even when I am trying to keep it light.

Here is the final product! I really like my cute bear, weird ears and all!

fullsizeoutput_11d

I worked really hard on this card because I want to give it to one of my best friends on her graduation day (tomorrow!!). I know she is going to love it even if is terrible, but I wanted to impress her with my watercolor skills.

I will let you know what she thinks about the card…

Supplies used:

  1. 12-color watercolor set (Any set you have works!)
  2. Canson XL watercolor paper; 140lb cold press (Amz)
  3. T ruler (Amz)
  4. Round #2 brush from the Benicci 15-pieces set (Amz)
  5.  Tombow plastic eraser (Amz)
  6. Sakura Pigma Micron 05 pen (Amz)

SWC_participant

Simply watercolor class (Day 1)

Hi everyone!

This week I am taking Kristina Werner’s Simply Watercolor online class (onlinecardclasses.com), and I decided to post the cards I make along the way to document my progress working with watercolors.

I have been looking for watercolor classes that I could take to learn more about this medium so when Kristina posted on her youtube channel that she will be offering one I jumped at the opportunity. Kristina is a genius working with watercolors and brush lettering! If you don’t believe me check out her youtube channel (K Werner Design).

Day 1: We are focusing on backgrounds and patterns

The objective of one of the lessons was to create a plaid pattern for a simple birthday card made completely from scratch.

fullsizeoutput_3e

I am not very happy with my plaid pattern, but hey it’s my first time creating a pattern from scratch.

After I finished creating the pattern, I couldn’t help myself and die cut the watercolor paper with a wonky stitch rectangle die.

fullsizeoutput_82.jpeg

Supplies used:

  1. 12-color watercolor set (Any set you have works!)
  2. Gansai Tambi Starry Colors (Amz)
  3. T ruler (Amz)
  4. Round #2 brush from the Benicci 15-pieces set (Amz)
  5. Simon Says Stamp WONKY RECTANGLES Wafer Dies  (SSS)

  6. Thin 3D foam squares (Amz)

That is all for now, but I stay tuned for day 2 of the simply watercolor class!

SWC_participant

Smooching time!

Hi everyone!

Today I wanted to talk a little bit about the smooching technique to create backgrounds. For me, this is one of the intersections where therapy and art meet. Smooching is a genuine exercise in letting go of control. You have to let the water do what it wants to do and have faith that the result will be beautiful, even though you may not think so at the beginning.

What do you need?

  • Watercolor paper of your choice (I have mostly worked with cold press 140 pounds), the important thing is that the paper can handle water and not come apart.
  • Distress inks or distress oxide inks (For the backgrounds shown here I used distress oxides because I love the chalky finish and because they allow you to layer colors).
  • Spray bottle with water.

How you do it?

First, pick your colors and apply the ink directly on an acetate sheet or a non-stick craft mat. Then spray the ink with water and you will see the ink bubbling up on the surface of the mat.

20180503_010834

I picked Shaded Lilac and Picked Raspberry to make two vibrant backgrounds and Shaded Lilac and Tattered Rose (not shown here) for two backgrounds with a pastel look.

Now you can smooch the paper on the ink. The water will move the ink in the paper creating interesting and beautiful patterns.

20180503_011847

Here are the four backgrounds I created.

You can also spray your backgrounds directly to get a distressed look.

To create complete cards from my four backgounds I heat embossed the sentiments and added stamped or die cutted creatures. Here are the cards I created with my backgrounds.

20180521_171726

The sentiments are from The Everything about you clear stamp set from Altenew and the cute fox is from the Sweet Stamp shop.

20180507_111214 (1)

The sentiments are from The Everything about you clear stamp set from Altenew and the butterfly die is from the Tim Holtz Sizzix collection.

20180507_111234 (1)

Here I mixed and matched my sentiments from Altenew and the Happiness stamp set from Neat and tangled. The lovely pigeon is from the Dina Wakley Scribbly Birds stamp set.

20180507_111155

The sentiments are from Altenew and the cute narwhal is from the Sweet Stamp Shop.

You can also spray your backgorund with Shimmer spray or add a little bit of Perfect Pearls powder to create a shiny background (see example below).

20180618_010244.jpg

Things to watch for:

  • Be careful when choosing the colors you want to mix. Mixing complementary colors because you can end up with a muddy brown color. You can layer complementary colors when using distress oxide but make sure each layer of color is dry before applying the next.
  • Make sure that the backgrounds are completely dry before you try to heat emboss because your embossing powder can stick to the ink used to create the background. It also helps to use an anti-static powder tool.
  • Once you start creating backgrounds with this technique you run the risk of going a little crazy and making a ton of backgrounds and only stop when you notice it is 3am (true story).

That is all for now…. But, be sure to give smooching a try!

The Journey Begins

Hi everyone and welcome to my Blog! 

This is my first ever blog post entry!

I want to use this space to share my journey while I reconnect with my artistic side. After more than five years of dormancy, my inner artist is asking (actually demanding) to be heard.  I believe that my journey properly started in March of 2017 when I discovered card making tutorials on Youtube. I, like everyone else that has kept on clicking on the related video suggested by Youtube, fell through a wonderful rabbit hole of card making tutorials hosted by women capable of making the most beautiful stuff with just paper, ink, scissors, and glue. I was hooked.

The first blogger and crafting genius that I binge-watched and followed was Jennifer Mcguire.  Her joy for creating is contagious and she truly inspires you to give crafting a try.  Yet, what really got me started was the fact that these would be short projects that wouldn’t consume me a lot of time, which allowed me to fit some card making hours into my busy weeks.

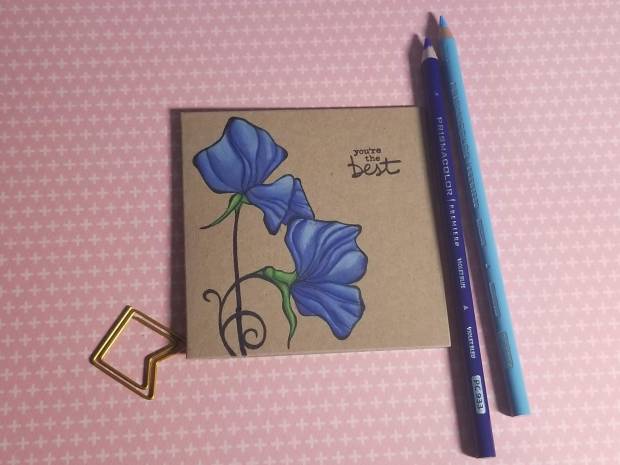
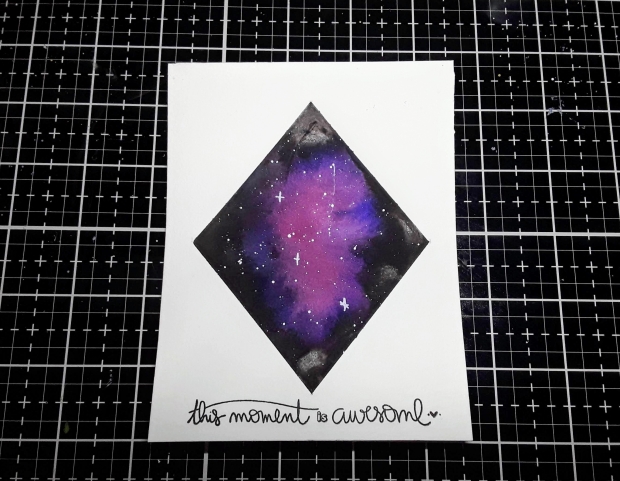
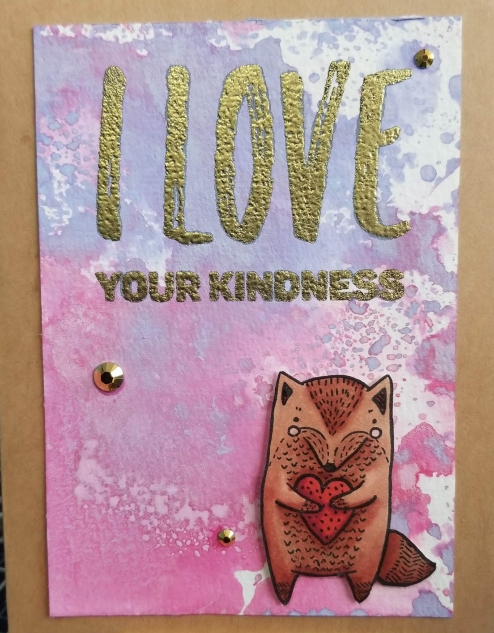
Here I include the result of my very first project. It is nothing fancy. A very simple card that I made for one of my best friends, someone who understands and shares my love for creating pretty things.

20170317_015425

This is the first card I made. Pretty simple and to tell the truth I just wanted an excuse to try heat embossing, which I was glad to discover is as exciting and rewarding as it seemed in YouTube cardmaking tutorials.

Once I started making cards I started to fall in love with the process. It is very relaxing to just color and fuzzy cut away all your anxiety and your stress. The act of creating something that you are proud of, no matter how small, is very rewarding, and if you have someone in mind when you are creating your card the process becomes even more exciting. The planning and designing of a card that could make someone smile and brighten their day just further improves the card making’s experience.

So there you have it, I am in love with card making and I plan to continue posting about my crafting projects as a learn new techniques along the way. Feel free to comment on your first time crafting and what makes it so rewarding for you.

Stay tuned because this journey just got started….

See you soon!


Supplies used in the card: 

1_348509_th

Mini Remix Happy Clear Stamps from The Greeting Farm

1_93839_fs

Sweet Wishes from Penny Black

1_61470_fs

Hero Arts White embossing powder

.

1_387662_fs

Tombow BRIGHT Dual Brush Pens